Table of Contents
- What Spinal Control Means (and How It Differs From Strength or Flexibility)
- Self-Assessment: How to Check Your Movement Control at Home
- Spinal Stabilisation Exercises: Starting Position and Movement Cues
- Spine Strengthening Exercises at Home: Repetitions, Duration and Frequency
- How Often to Do Spinal Stabilisation Exercises for Best Results
- Pilates Exercises for Posture: Spinal Alignment Beyond the Mat
- Safety: Warning Signs and When to Seek Professional Care
- Conclusion: Building Spinal Control That Lasts
- Frequently Asked Questions
Last Updated: October 5, 2026
What Spinal Control Means (and How It Differs From Strength or Flexibility)
Spinal control is the ability to keep your spine steady while your arms and legs move. It is a skill, not a muscle size. Strength is how much force you can make. Flexibility is how far you can reach. Control is whether your spine stays safe during both. (Source: the deep core muscles act as a natural brace)
Most people train the first two and ignore the third.
Someone can deadlift a heavy weight but cannot lift a grocery bag without their lower back aching.
Why Strength and Stretching Alone Don’t Fix the Spine
Strong muscles can still fire at the wrong time. Flexible joints can still move too far.
Picture a car with a powerful engine and no steering. That is a strong back with poor control.
The deep core muscles act as a natural brace. They switch on just before you move a limb. When that timing is off, the lumbar spine takes the load instead.
The Role of Breathing and Coordination in Movement Control
Breathing sets the rhythm for good control. As you exhale, the deep abdominal muscles engage and the ribcage settles.
Try this: place one hand on your ribs. Breathe in wide, then breathe out slowly. Feel the ribs drop. That gentle drop is your core switching on.
Coordinating breath with movement is the missing link in most home routines. Get it right and every exercise works harder for you.
Self-Assessment: How to Check Your Movement Control at Home
You can test your own movement control in under five minutes. No equipment needed. Just a flat surface, a phone timer, and a little honesty.
These four checks look at balance, breathing, pelvic control, and movement quality. They are not a diagnosis. They are a way to pick the right starting level so you do not begin too far ahead of your spine.
How to Score Each Check
Give yourself a score for each test using this simple scale:
- 2 points, steady, no wobble, no arch, easy to breathe
- 1 point, some wobble or arch, but you can correct it
- 0 points, clear arch, hip shift, held breath, or discomfort
Add your four scores for a total out of 8. Write it down so you can retest in two weeks.
Four Checks for Balance, Breathing, Pelvic Control and Movement Quality
1. Leg lower test (pelvic control). Lie on your back, knees bent, feet flat. Breathe out and let your lower back settle into its natural curve.
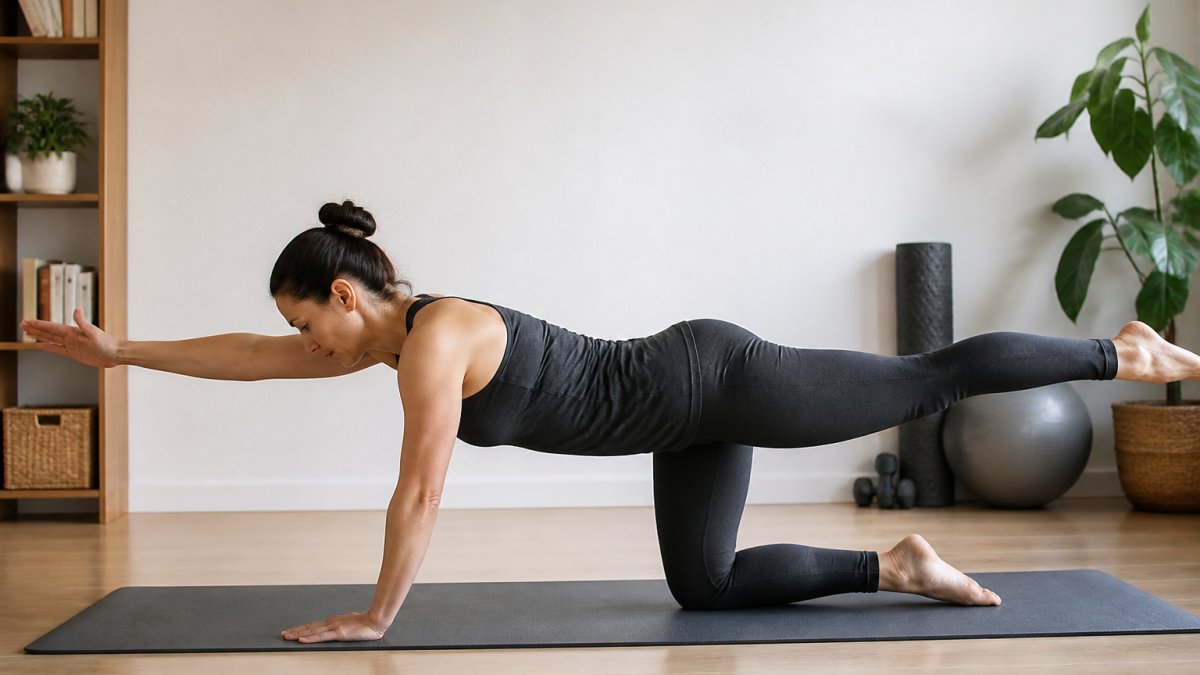
2. Four-point hover (movement quality). Kneel on all fours with hands under shoulders. Lift one hand off the floor by about two centimetres.
3. Single-leg stand (balance). Stand tall near a wall or bench for safety. Lift one foot and time how long you stay steady, up to 30 seconds.
4. Breathing check (coordination). Lie on your back with one hand on your ribs and one on your lower abdomen.
What Your Score Means for Where You Start
- 7-8: Start at Week 3 of the plan below and add balance work early.
- 4-6: Start at Week 1 and follow the schedule as written.
- 0-3: Start with breathing and pelvic tilts only. Repeat Week 1 for two weeks before adding load. If any test causes pain, stop and seek advice from a physiotherapist or your GP.
Retest every two weeks using the same four checks. A rising score is a clearer sign of progress than how sore you feel the next day.
Film yourself on your phone during these tests. Most people cannot feel a small arch or hip shift in real time, but they spot it instantly on video. Watch at half speed to catch the moment control is lost.
Spinal Stabilisation Exercises: Starting Position and Movement Cues
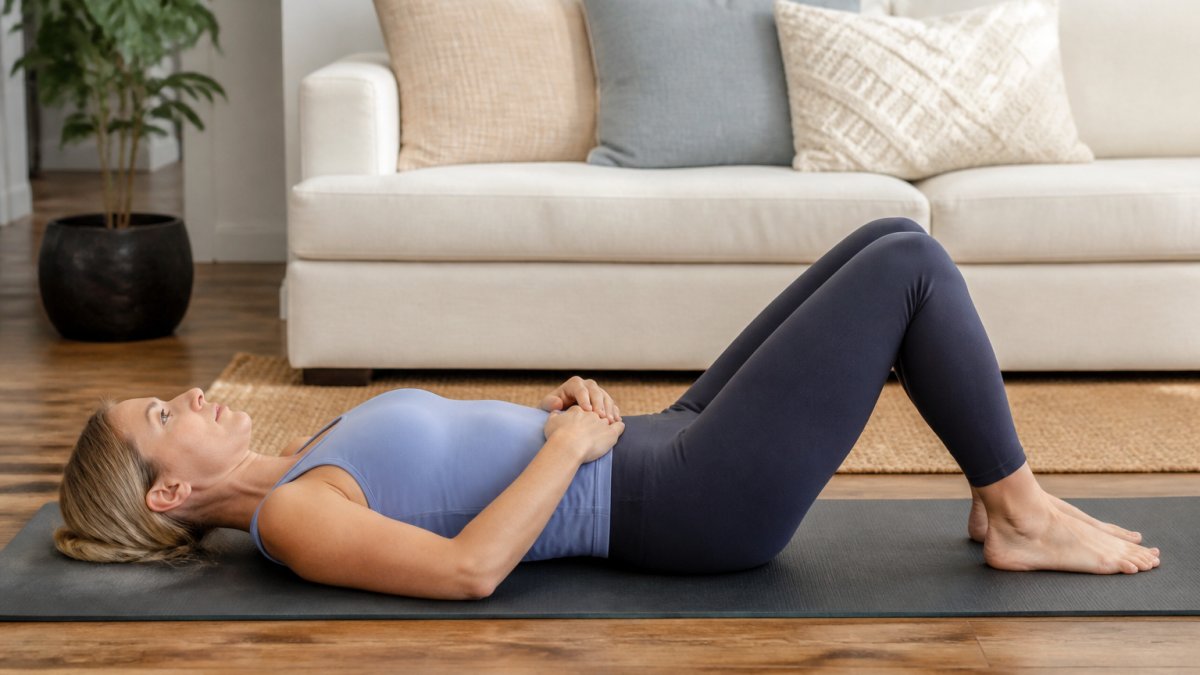
Start every spinal stabilisation exercise from a stable spine position. Lie on your back with knees bent and feet flat. Let your lower back rest in its natural curve, not pressed hard into the floor.
This is what we call Stable Spine in the Menezes Method, rather than forcing a “neutral spine” position. It respects how your body is built.
Finding Your Stable Spine Position
Breathe out and let your ribs soften. Your pelvis should feel level, not tilted. Keep your neck long and your jaw relaxed.
If your back hurts in this position, place a small towel under your lower back. Comfort matters more than perfection.
Core Activation Drills: Knee-to-Chest Stretch and Pelvic Tilts
The knee-to-chest stretch releases tension in the low back. Pull one knee gently toward your chest, hold for a few breaths, then switch sides.
Pelvic tilts teach the deep core to switch on. Gently rock your pelvis so your lower back flattens, then returns to its curve. Move slowly.
Do both drills before any strengthening work. They wake up the supporting muscles.
BOOK YOUR FREE 15 MINUTE CONSULTATION →
Spine Strengthening Exercises at Home: Repetitions, Duration and Frequency
Aim for quality over quantity. Two sets of five slow repetitions beats twenty rushed ones. Hold each position for three to five seconds.
Stop when your form slips. That is your true set limit, not a number on a page.
A 4-Week Progressive Schedule With Milestones
| Week | Focus | Daily Time | Milestone |
|---|---|---|---|
| 1 | Breathing and pelvic tilts | 5 minutes | Flat back hold for 5 breaths |
| 2 | Knee-to-chest and hovers | 8 minutes | No hip shift in four-point hover |
| 3 | Add walking and gentle twists | 10 minutes | 15-minute walk without ache |
| 4 | Full routine plus balance work | 12 minutes | Steady single-leg stand, both sides |
Add one new movement each week. Never rush the step before it.
Skipping straight to strengthening exercises before you can hold a stable spine position is the most common mistake we see. It loads a spine that cannot protect itself yet, which is how home routines cause flare-ups instead of relief.
How Often to Do Spinal Stabilisation Exercises for Best Results
Daily short sessions beat one long weekly session. Five to ten minutes a day is enough to build spinal stability. Consistency is what changes movement patterns. Your nervous system learns through repetition, not intensity.
A Weekly Frequency Template
- Days 1-5: Full routine, 5-12 minutes depending on your week in the plan.
- Day 6: Walking only, 15-30 minutes at a brisk but comfortable pace.
- Day 7: Rest or gentle breathing practice for 3 minutes.
If you miss a day, do not double up. Resume where you left off. Two short sessions on the same day do not replace two separate days, because the nervous system consolidates control between sessions, not within them.
Progression Criteria: When to Move to the Next Week
Move forward only when you can meet all three criteria for your current week:
- Complete the full routine with no form slip for two sessions in a row.
- Hold the stable spine position for five slow breaths without your back arching.
- Finish the session without next-day soreness above a mild, fading ache.
If you cannot meet all three, repeat the week. Repeating a week is progress, not failure. Most people spend two weeks on at least one stage.
Deload and Back-Off Rules
- Mild soreness that fades within 24 hours: continue at the same level.
- Soreness that lasts more than 48 hours: drop back one week for three sessions.
- Sharp pain, pain down a leg, or pain that wakes you at night: stop and seek advice from a physiotherapist or your GP.
- A stressful week or poor sleep: do the breathing and pelvic tilt drills only. Something is better than nothing.
Measurable Milestones to Track
Use your self-assessment score from earlier as your main marker. Alongside it, track these simple numbers in a notebook or phone note:
- Stable spine hold: target five slow breaths by end of Week 1.
- Four-point hover: target no hip shift on both sides by end of Week 2.
- Walking: target 15 minutes without ache by end of Week 3.
- Single-leg stand: target 30 seconds steady on both sides by end of Week 4.
Review your notes every two weeks. If two milestones have stalled, repeat the previous week rather than pushing ahead.
Pilates Exercises for Posture: Spinal Alignment Beyond the Mat
Pilates exercises for posture work best when they carry over into daily life. The mat is practice. The real test is your desk, your car and your kitchen bench.
Good spinal alignment is not a rigid pose. It is a shape you can return to easily, again and again.
Everyday Habits: Sitting, Standing and Walking
- Sitting: Keep both feet flat. Let your ribs stack over your hips. Take a standing break every 30 minutes.
- Standing: Shift weight evenly between both feet. Avoid locking your knees.
- Walking: Let your arms swing. A brisk walk keeps the back limber and the spine conditioned.
- Bending: Hinge at the hips, not the waist. Keep the load close to your body.
Breathing, posture and core activation all connect. That link is central to the Menezes Method, which teaches clients to notice how everyday habits place stress on the body.
Australian Institute of Health and Welfare data on back problems
Safety: Warning Signs and When to Seek Professional Care
Stop and seek advice if you notice any of these signs:
- Pain that shoots down a leg or arm
- Numbness, tingling or weakness
- Pain that wakes you at night
- Loss of bladder or bowel control
- Pain after a fall or injury
The last two need urgent medical care. Do not wait.
For everyone else, general exercise is usually safe. But a personalised assessment catches problems a generic routine misses. If your pain has lasted for years, a tailored program is worth more than another YouTube video.
healthdirect guidance on when to see a doctor for back pain
Conclusion: Building Spinal Control That Lasts
Spinal control takes weeks to build, not days. The challenge is staying consistent when progress feels slow.
At Menezes Method Pilates, we assess how you move before prescribing anything. Our approach uses the B-Line in place of navel to spine, Stable Spine instead of neutral spine, and the SpinalCore system for core strength. With over four decades of teaching behind the method, we tailor each program to your body.
Book your free 15 minute consultation and build spinal control that lasts.
Frequently Asked Questions
What exercises can improve spinal control at home?
Start with knee-to-chest stretches, pelvic tilts, shoulder bridges and gentle spinal twists. The key is slow, controlled movement rather than speed or repetition count. Focus on keeping your spine stable while your arms and legs move, and use your breath to guide each repetition. A broom-handle stretch and seated rotation can also help maintain spinal mobility. Practise on a mat in a clear space, and stop if you feel sharp pain.
How often should I practise spinal stabilisation exercises?
Most people benefit from practising spinal stabilisation exercises four to five times per week, with sessions lasting 10 to 20 minutes. Start with shorter, more frequent sessions rather than one long session. If you are new to exercise or recovering from injury, begin with three sessions per week and build gradually. Consistency matters more than duration, and your spine adapts best to regular, moderate input rather than occasional intense effort.
How long does it take to improve spinal control?
Many people notice better awareness and reduced tension within two to four weeks of consistent practice. Measurable improvements in movement control and posture often take six to twelve weeks. Progress depends on your starting point, how often you practise, and whether you carry the principles into daily habits like sitting and walking. A structured program with clear milestones helps you track changes objectively.
How do I know if I am doing spinal stabilisation exercises correctly?
Signs you are on track include being able to breathe normally while holding a stable spine, feeling your deep core muscles engage without gripping or bracing hard, and completing movements without your lower back arching or rounding unexpectedly. If your back muscles feel fatigued before your core, or you hold your breath, you are likely compensating. A qualified instructor can assess your movement control and correct subtle errors.